I Was a Winner at SAS4Kids

Pages

Wednesday, September 6, 2017

Happiest Wishes On Your Birthday

I was looking on Pinterest for some cards using designer papers.  I had a whole Paper Studio 4 x 6 paper pad that had a lot of bold sparkly birthday patterns that I really liked, but I found they are sometimes hard to make a card with.  I found quite a few examples where you use the patterned paper on the bottom half, separate it with some ribbon,  and use the white space above the ribbon to stamp your sentiment.  I followed those examples mostly, but instead of just stamping the sentiment on the top white portion, I added a framed sentiment in between the two layers.  I was really happy with the results, and saved this one for my granddaughters upcoming birthday.  The others I will donate to SendASmile4Kids.  The cupcake designer paper on the bottom half came from the stack I mentioned above...Paper Studio's Birthday Extravaganza stack, and has glitter on the cupcake papers as well as the icing!  I stamped the sentiment from a Stampin Up set I've had forever in Momento's Rich Cocoa ink & die cut it out with a stitched square die. Then I backed it with some pink card stock from my stash, also die cut with the next size up stitched square. I really love how they all turned out!!  Thanks for stopping by to take a peek!!


Challenges Entered:


Monday, September 4, 2017

Hoppy Birthday

I've been trying to get another pack of cards made & sent off to the SendASmile4Kids organization.  My husband is actually working tomorrow part of the day, then coming home to cut the grass!  Not much of a holiday, but we had not real plans anyway.  So I'm going to concentrate on making a lot of cards tomorrow.  I did manage to get a few fun cards done the last couple of days using Technique Tuesday's Felix the Frog stamp & die set.  Below is one of those finished cards.  I stamped Felix on some green designer paper then cut him out using the die.  The striped paper & blue card stock were from my stash.  I heat embossed in white the sentiment & cut it out using a stitched bubble die by Spellbinders.  The white panel behind Felix was cut using a stitched square die.  Then I added the two blue enamel dots from my stash.  I thought it turned out pretty cute!!  Thanks for stopping by to take a peek!


Challenges Entered:


Saturday, August 5, 2017

Birthday's Are Scary

This is a card I made for my 3 year old grandson's birthday.  I decided to use the Silly Monster set from Your Next Stamp because the images are just too cute!  I colored him with a green Real Brush Marker and cut him out by hand.  The sentiment stamps are from the same set. Couldn't help but put him on the card with a wobble sticker, and glue two different size of crazy eyes over the ones he comes with!  I cut the whole panel out with a rectangular stitched die as well as the colorful print panel & green panel behind him.  Then I attached all three panels to a brown base card. I'm guessing he won't be too impressed with it...he is only 3 years old, but I know his mother will appreciate it and it was fun to make.  I thought it turned out pretty cute!


Challenges Entered:


Sunday, July 23, 2017

Happy Birthday

I was checking out cards I saved from Pinterest today to get some mojo going.  I always love bright rainbow colors...they always make me happy!  So I came up with this card...a combo of two different card designs from Pinterest.  I cut all the balloons out using the 2nd smallest balloon from the MFT Dienamics Balloon Stax.  Then I embossed them all with a Darice dotted folder, and tied black embroidery floss around the bases. After I arranged them on a white card base I cut them out with a stitched rectangle die keeping the floss strings out of the way.  I then gathered all the strings together and glued them down under the Happy Birthday sentiment (from Tim Holtz) embossed with white powder on a black strip of paper. Then I glued the whole panel down on a black panel & glued it all onto a white card base.  I think it's both fun and colorful!!  Thanks for stopping by to take a look!


Challenges Entered:


Friday, July 21, 2017

Happy Birthday Wishes

One last post today with another card I created for SendASmile4Kids!  This is one of Tim Holtz's Crazy Dog Stamps. I also have his Crazy Cats & Crazy Birds stamp sets....they are way too much fun to color up & put on a card and I will be using them a lot!  He also has an accessory stamp set with all kinds of hats, ties, balloons, gifts etc, just about any kind of accessory for holidays & occasions, and dies to cut them all out!  I used Zig Clean Color Brush markers to color everything.  Sorry I can't tell you where the sentiment came from right this second. Since I make mostly birthday cards I have a ton of birthday sentiments & they're hard to keep straight!  Thanks for stopping by to take a look!


Challenges Entered:


Be Your Own Kind of Beautiful

This is another card I made for the SendASmile4Kids organization.  The white panel was embossed with a Honeycomb Folder by Cricut.  The flowers were created by using Altenew Inks & the Garden Treasure layered stamp set from Altenew.  They also sell dies to cut these flowers out but I don't own them so I fussy cut them out & arranged them & glued them down on the embossed panel, then glued the whole panel down on a matching pink card base.  The black sentiment base was cut out using a banner shape from a set of Sizzix dies I own, and I heat embossed the sentiment with white powder & Versamark.  I really like the sentiment, but for the life of me can't find it at the moment to tell you the maker.  Think it was from another Altenew stamp set, but I could be totally wrong!!  Anyway...I thought it turned out to be a pretty card.  I am addicted to layering stamp sets!!  Thanks for stopping by to take a peek!!


Challenges Entered:


Thursday, July 20, 2017

Awesome Takes Practice

Over the last week I made a bunch of cards for SendASmile4Kids.  This particular one was not my usual card, it was a lot of fun for me & I will be making some more of these in the future!  The sentiment & glasses die cut are from My Favorite Things.  There are a lot of fun & geeky sentiments from the stamp set & can be used for a number of occasions along with the die cut glasses.  The card base is Navy, and I used red card stock from my stash to cut out the glasses & stars.  The stars were actually cut from a Simon Says Holiday Shapes set. I used a Spellbinders border die to cut the left side of the white center panel. The card was cased from one I saw on Pinterest.  Thanks so much for stopping by to take a peek!!


Challenges Entered:


Thursday, June 1, 2017

Sweet Birthday Wishes

I need to send another box of cards to send to the SendASmile4Kids organization soon & I saw a Simon Says Stamp challenge that required using circles.  I looked over all the Pinterest pins I had collected looking for anything that involved circles for inspiration.  I came across a Lollipop Card pin I had saved from an InkyPinkies blog post from 2012.  I thought it was really cute & that the kids in the hospital might like it.  You're supposed to cut/punch 10 circles of coordinating paper & then glue them in a circle to make the lollipop adding a brad in the center, and attach an actual lollipop stick with bow around it.  Well I punched out 12 circles from a Colorbok Primary Geometric stack & DCWV Basic stack, added an enamel dot from Teresa Collins Essentials in the center, colored a piece of white card stock with the Cool Grey 3 Promarker & rolled it up to look like a stick (can't send cards with real sticks to the Children's Hospitals), then tied the bow around it with some satin ribbon from my stash.  I then added the Sweet Birthday Wishes sentiment from Hero Arts, added the whole panel cut out with a stitched rectangle from Simon Says Stamp to the same blue card stock I used for a few of the circles.  I thought it turned out pretty darn cute & intend to make a few more with different colored cardstock circles!!  Thanks so much for stopping by to take a peek!


Challenges Entered:

Tuesday, May 30, 2017

Make A Wish

I made this Birthday Card for my grandson Russell.  I cased the design from a Scrapbook.Com gallery card that I thought was really cute!  The star die cuts were made using several companies dies...MFT, Simon Says & Cricut using card stock from my stash. I heat embossed some patterns across some of the stars with clear embossing powder & stamp patterns from Reverse Confetti & Simon Says.  The sentiment is from MFT 's Count The Stars stamp set. I die cut the white panel out with a Simon Says stitched rectangle and glued all the small stars on, and used foam tape on the two largest stars in the corners.  Then I added some Pretty Pink Posh clear droplets around the sentiment & stars.  He'll probably think it's pretty cool...as much as a boy his age can!!  I had a hard time capturing a photo of this card, so there's a bit of a shadow from some of the stars!! Thanks so much for stopping by to take a peek!!


Saturday, May 20, 2017

Happy Anniversary

My daughter & son-in-law just celebrated their wedding anniversary this past Wednesday.  I called them up to wish them a Happy Anniversary & apologize for not having sent their card/gift yet.  It's always a crazy busy time of the year with Mother's Day, Birthday's, First Communion's etc & I just got around to finishing their card.  I needed some inspiration & turned to the My Favorite Things color & sketch challenge for ideas.  The gray, pink & raspberry card stock are from my stash.  I stamped the Happy Anniversary from Just Rite's Extra Grand Sentiments with Versamark & heat embossed it with some pink embossing powder from Recollections.  I have no idea where I got the champagne glasses in the lower left.  I stamped them with Versamark also & heat embossed them with some gray embossing powder, colored in the champagne with Zig Clean Color marker & brushed over it with some clear Wink of Stella to make it sparkle.  Then I die cut the whole panel out with the rectangular SSS Bundle of Stitched Shapes, added a few Imaginisce brads in the corners & adhered the whole panel to a dark gray card base with foam mounting tape. A fairly simple card, but I thought it turned out cute & I hope they like it!  Thanks for stopping by to take a peek!!


Challenges Entered:


Sending Big Hugs

My coworker who has cancer just went through surgery last week to remove as much as possible, and then will resume chemotherapy to destroy the rest of it.  Up until the surgery she was in the office working every day, leaving in the afternoons when necessary to get chemo.  She said even though the chemo wore her out, it would just make her crazy to just sit home & worry about it,  I think she's pretty amazing!  Anyway...I thought this might bring a smile to her face.  I stamped the purse/bag made by TooMuchFunRubberStamps onto some lightly colored designer paper twice, then fussy cut them both out & glued them together.  The flowers & leaves were die cut out of my scraps with My Favorite Things Stitched Flowers that came in one of their kits I bought a while back.  The Sending Big Hugs sentiment is from Simon Says Stamp's Big Scripty Greetings.  Thanks for stopping by to take a peek!


Challenges Entered:


Friday, May 5, 2017

Loads of Love for Dad

 I've had the Hero Arts Little Hoot stamp set for a while now and never used it & thought it would make a cute Father's Day card.  You could also use it for a Mother's Day card, or any general Love You card for a parent/child situation, even a Hero's/Mentor card!!  I chose to use the bears image & colored both of them with Promarker's Dusty Pink & Shale colors.  The Loads of Love sentiment is from another Hero Arts stamp set. After coloring the bears I went about trying to find some papers that would match the bears color.  Not the best way to plan a card,  but I ended up finding a solid base card color that matched, and drummed up a patterned paper that I think matched just as well!  While coloring the Papa bear, I noticed that there was a flaw in the paper & the marker color was noticeably darker in that area.  Not to worry... I die cut and added the little pink heart right over top of it. It was just like magic because it was right where the Papa Bear's heart would be.  I also added some Wink of Stella marker over the pink heart to make it shimmer.  Really love how it turned out!!


Challenges Entered:


Tuesday, April 25, 2017

Dad Can Fix Anything #2

This Father's Day card is basically the same as the one below....just different orientation & paper.  The glittery plaid came from the same DCWV Dot's, Stripes, & Plaid mat stack.  I used my Promarkers to color the drill to match the paper, and the sentiments are from the Hero Arts #CL335 stamp set.  Still masculine colors but a little bit brighter than the first one!  Love how  you can use the same stamps/designs to make a little bit different card!!  Thanks for stopping by to take a peek!


Challenges Entered:


To A Dad Who Can Fix Anything

I know it's not even Mother's Day yet, but I am creating cards for the SendASmile4Kids organization, so you have to be creating early for the next holiday/event!  Thus you will see a succession of Father's Day cards in my next few posts. I specifically bought the Hero Arts stamp set #CL335 for this purpose.  There are really not enough men/boys/father's stamp sets out there on the market in my opinion!!  I found a card design on Pinterest that I liked & used masculine colored paper to recreate the card with my Hero Arts stamp set. This is my first card ...an A2 top folding card using the striped glitter paper pad DCWV Dots, Stripes, & Plaids.  Dad's cards can have a little glitter too right?  The drill and both sentiments are from the Hero Arts set mentioned above.  I colored the drill in with a gray Promarker to match the paper.  Thanks so much for stopping by to take a peek!


Challenges Entered:


Saturday, April 22, 2017

Happy Father's Day

So I've started working on some Father's Day cards for the SendASmile4Kids organization.  I've been choosing designs I like from Pinterest & this came from a Split Coast Stamper rbright & was posted back in January 2010!!  I figured out the measurements myself and changed it up a bit, but in general it's the same design.  I like to use up the multitudes of patterned paper I have & this card fit the bill.  The patterned paper is from Recollection's Prince Charming Paper Pad, and the blue card base & brown paper used were from my stash.  The tools & sentiment stamps are from Hero Arts #CL335.  I colored the little tools in using my Promarker's Warm Grey 1 and Warm Grey 5.....and get this...those little brown enamels in the lower right corner...I made them a long way back melting Perler Beads in the oven...who'd of thunk!!  Thanks so much for stopping by to take a peek!


Challenges Entered:


Saturday, April 15, 2017

Congratulations!!

My daughter Elaine & her husband Bryan have been married for 5 years yesterday April 14th!!  They just welcomed their third child into this world several months ago, and so it's been a very busy 5 crazy years for them!!   I  googled 5th anniversary colors like the weirdo I am, and silver & pink were a couple of the suggested colors. I made this anniversary card for them,using the color of the bridesmaid dresses/wedding theme color which happened to be pink & silver!  I placed the Altenew Halftone Circles stamps in a pattern consistent with the Altenew Sketch Challenge using my Misti.  First I inked the pink ones & stamped them with Momento Rose Bud ink.  Then I stamped the other two circles with Versamark ink & heat embossed them using a silver embossing powder.   I stamped the sentiment with Versamark & also heat embossed that with the same silver powder.  The pink bow that the charm is attached to is from my stash.  The charm says To Love and to Cherish.  I was digging deep into my stash for some sort of embellishment & found it in the bottom of the box.  I know I saved it from a past family wedding favor, and thought it fit perfectly on this card!  Thanks so much for stopping by to take a peek!!


Challenges Entered:


Saturday, April 8, 2017

Happy Mother's Day

So I decided I wanted to make a bunch of cards today and proceeded to start off with a new stamp set I hadn't used yet from Winnie & Walter called In Bloom: Lola's Bouquet with Joni Andaya.  It has a bunch of flower layering, leaf layering, and several vase stamp choices.  I thought I might make a Mother's Day card & enter it in the Winnie &Walter Rerun Challenge, casing design team member Heather Hoffman's card.  WELL...let's just say that I don't think it comes close to hers but besides that, it defeated the whole purpose of making a "bunch" of cards, because I had to do all kinds of masking & thinking!!!  So....no bunch of cards today...and that's okay, it was still fun & I now have a Mother's Day card to give to my Mom.  The fact that she doesn't see as well as she used to at her 86 years of age is a blessing for me because I totally screwed up the stamping of the sentiment as you can see!  The Happy Mother's Day sentiment is from a Hero Arts set (CL334). Thanks so much for stopping by to take a peek!!


Challenges Entered:

Thursday, April 6, 2017

Inspiration Abounds!

So I've made another card to send to my coworker battling cancer.  She in her own words "is very lucky" because the chemotherapy treatments she endures do not make her sick to her stomach...just very tired.  I think she takes chemo only once a week, but I am still amazed as all my coworkers are, that she has seemed to never miss a day of work since she's been diagnosed!!  She said there is no sense in sitting home dwelling on her sickness,  I was actually inspired by a Pinterest link from the blog "Simply Stamped" from April 2013!   I recently purchased the Halftone Circles stamp set from Altenew & knew it would work perfectly with this sketch!!  The dark blue & yellow ink colors were Memento Dye Inks, and the Turquoise ink is Turquoise Gem Chalk ink from Versamark.  The "Sending You Good Vibes" is from the Avery Elle set called Sending You, and the You Are My Inspiration" stamp is from the same Halftone Circles used on the card.  I stamped all those sentiments with Versafine Black Onyx Ink using the Misti so that I could reink & stamp them several times to get a dark sentiment over the inked circles.  Thanks so much for stopping by to take a peak!!


Challenges Entered:


Friday, March 17, 2017

Happy Spring!

Even though we've had a rather mild winter here in Northern Kentucky, I'm still looking forward to Spring! Some of our spring bulbs have already come up & bloomed and I have no idea how our perennials will fair with all this warm/cold back & forth weather lately.  I saw a card on the MASKerade pinterest site & tried to recreate it with my own stamps & flowers. This flower is actually the outline of a layered stamp from the Geometric Flowers set from Altenew.  I LOVE the layered flower sets they have, but also like to stamp just the outline with Versamark & emboss with white embossing powder & color it in with Zig Clean Color Brush Markers as I did here.  I added a black enamel dot to the center of the flower, and stamped the word "happy" from the MFT All Occasions Sentiment set & cut the "spring" word from the Walter & Winnie Big, Bold & Seasons set.  Talk about mixing it up!!  Anyway..I added one yellow sequins behind the word happy just to give it a tiny bit extra.  I love CAS cards & I created two more just like it coloring the flower in with an orange & blue zig marker!  Thanks for stopping by to take a peek!


Challenges Entered:


Friday, February 24, 2017

Trials Make Us Stronger

I love making cards but am not super creative by nature, so I love to look at Pinterest to get ideas on how to use the stamps I really like and own to come up with ideas.  I came across this Pinterest post at https://stampercamper.com/2017/01/01/special-reason/.  I loved the design & technique she used so I recreated it with a flower stamp of my own.  It is actually a layered stamp set from Altenew called Majestic Blooms but I only used the outline stamp to make my flower.   I'm not sure I actually did the exact same technique, but did what I thought was similar and liked the outcome!  I stamped & heat embossed the flower outline with Versamark & white embossing powder.  Then I turned it over & "colored" it with Tim Holtz Picked Raspberry distress ink & cut it out with the coordinating die.  I used the same die & cut the flower out of white card stock & glued the colored vellum over top of the card stock die.  I then popped the entire flower up on some white card stock with foam tape & stamped the sentiment with Versafine Black Pigment Ink.  OF COURSE...in all my creative frenzy...I cannot find the sentiment stamp set but I believe it is from the Unity Stamp Co.  I added some silver sequins in the flower center & around the sentiment, added the entire panel to some pink card stock I had on hand that matched the pink of the flower, then adhered that to a white card base.  I repeated the whole process to make more of the same card using the colors yellow, orange, purple & pistachio ink for the flower.   I will mail the pink version you see here to my coworker battling cancer.  The others ( with different sentiments) will be donated to a children's hospital!  I'm sorry that the only picture of my card that I captured is blurry!! Thanks for stopping by to take a peek!!


Challenges Entered:


Monday, February 6, 2017

Just Dropping You A Line

I learned recently that a coworker of mine has cancer & will have to undergo chemotherapy.  I made this card for her just to let her know I was thinking of her and hopefully bringing a little smile to her face.  Both the image & sentiment are from a set from Serendipity Stamps Inc called Three Dresses.  I bought it a while ago....I think from a yard sale or something, and had never used it before.  I think the sentiment is so clever with the image!  I colored the three dresses with some watercolors I bought at Michael's recently, and cut it out with a stitched rectangle die.  The blue mat & patterned paper behind that both came from a DCWV set called Citrus Stack.  I think she'll like it and I really enjoyed making it for her!  Thanks for stopping by to check it out!


Challenges Entered:


Friday, January 13, 2017

Happy Birthday Mom!

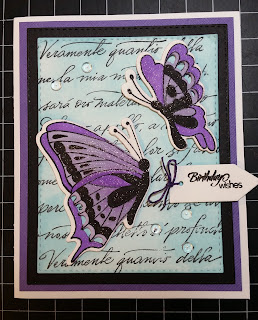
I have not posted anything recently because of course ..Christmas happened...but more importantly..I vowed to never make another card until I completely reorganized my craft room & purged a lot of product at the same time!  Although I probably vowed to do the same thing the last 2 years, I really meant it this time and did not make or send out any cards since that last post.  I am happy to say I made a lot of progress, but still have a lot of work to do.  However I could not disregard my mother's 86th birthday.  She will turn 86 on this Monday January 16th, and I have made her birthday cards for about the last seven years at least, so I couldn't disappoint her!!  Purple/Lavender is her most favorite color of all times....it has not changed over many, many years!  I know first hand & have a constant reminder.  My husband & I bought her & my dad's house about 16 years ago.  Our master bath tub is lavender as well as the sinks, and there are strategic bath tiles of lavender in both the shower & on the tile floor.  Her next favorite color is rose, and that is the color of tile & fixtures in our second bathroom!!  When they sold us their house, they moved into a condo and my Mom proceeded to paint the bathrooms & walls there in lavender & rose...who'd of thunk!!  We have not been able to remodel the house since we bought it due to economic woes & I think when my mom visits from time to time...that's just fine with her!!  Anyway...enough storytelling..here is the card I created for her....oh...I forgot to say...butterflies are another one of her passions!!  I have never used these  butterfly stamp & die cuts before, and sadly, I cannot even tell you where I got them from.  I'm sure I probably purchased them with my Mom in mind!!  I colored them with my Promarkers & then added some shimmer with a Wink of Stella  marker, and added a few Pretty Pink Posh clear droplets! Well...sorry I ranted on too much, but thanks for listening & I hope you like my card & I thank you for stopping by!!


Challenges Entered: